
Back Lever Tutorial - Your first calisthenics party trick
The most impressive calisthenics skill for Beginners - The Back Lever
The back lever is a cool and beginner-friendly calisthenics movement. As well, it is a great bodyweight exercise for building strength and developing that gymnastic body (or calisthenics body if you will). Whereas you don’t see too many children rocking muscle ups or front levers during play time, the back lever is actually something you may have tried before as a child, messing around on the monkey bars or pull-up bars. It is one of the most basic calisthenics movements and require much less effort than for example the planche and front lever. In this article I will go over some positional cues to keep in mind when learning and training the back lever - in particular I'll cover the correct shoulder positioning, grip variations, and spinal positioning. As well, I will cover the different back lever progressions you should work through. Finally, I will go over some exercises which will help build strength specifically for the back lever. If you want to learn how to do the back lever, you’ve come to the right place. Let’s go!

Check out the Back lever video tutorial for in depth and detailed information regarding the bak lever, its progressions and form cues.
Back lever video tutorial - Table of contents
0:00-0:53 - The back lever
1:00-1:30 Pre-requisite : German Hang
1:35-2:20 what grip to use in a back lever
2:35-5:25 Body Positioning for back lever
5:52- 8:40 Back Lever Progressions
8:41-9:25 Dynamic Repetitions to strengthen back lever
9:30-10:30 Core Strength for back lever
What do you need before starting to train the back lever - prerequisites
Before we get into the meat and potatoes of this post about the back lever, there is one exercise I’d like to note that I think you should be comfortable with, before getting into the rest of the progressions and training for this impressive calisthenics skill for beginners. This exercise is called the German Hang.

All you’re doing with the German Hang is, from the hanging position, bringing your feet up and over your head, and continuing to rotate, so that you have done almost a complete back roll while still hanging onto the bar/rings you’re using. Once you are able to do the German Hang and perform these dynamic repetitions with relative comfort, I would say that you are then ready to start directly training the back lever progressions.

Dynamic variation of the German Hang
Body Position for back lever (and general gymnastic body positional cues)
Before we get into the back lever progressions, I want to go over some important things to keep in mind when it comes to your body position when doing the back lever. These are:
Correct shoulder position
Grip variation, i.e. pronated vs. supinated grip
Spinal positioning
To prevent injury and for proper form, it is important to keep the positioning of your shoulders in mind when doing the back lever. In particular, there are two things you should be doing with your shoulders: protracting, and depressing them. Protracting and depressing are mongst the general gymnastics body position cues (you also several others such as retracting and elevating scpula, as well as hollow and arched body/spine etc.)

See what I mean by protracting and depressing your shoulders
To protract your shoulders, think of bringing your shoulders together in the front.
To depress your shoulders, you want to push your shoulders down and elongate your arms. Think about it as though, if you were sitting down with your hands hanging by your sides, you’re trying to bring your hands closer to the ground.
By protracting and depressing our shoulders, we are stabilizing our shoulders while in the back lever position. This is helpful in terms of preventing injury, with the added benefit of making the back lever easier, since your arms will be at less of an angle to your body when you are protracting and depressing your shoulders.
Regarding your spinal position in the back lever: your spine should be flexed. You want the upper part of your spine - not your whole spine so that you’re bent over, but just the upper part, sort of like a hunched back - to be flexed. This will help by making your body shorter and thus the back lever easier. In addition, doing this will help build strength in your spine flexors which will help you keep your body straight while in the back lever.

Check the video out to see what I mean regarding spinal positioning
In summary regarding the body position, we have three cues to keep in mind while in the back lever:
Protract the shoulders
Depress the shoulders/scapula
Flex the upper part of the spine

Three form cues to keep in mind when doing the back lever
Backlever grip - Pronated vs. supinated
Briefly, I would like to cover my recommended grip variation while you are in the back lever. It is possible to do either a pronated or supinated grip. I recommend you stick with a pronated grip, at least at the beginning. The reason is that doing the back lever with a supinated group is very hard on your elbows and biceps. So, what I’d recommend is getting comfortable first with the pronated grip, and gradually working towards doing the back lever with a supinated grip.
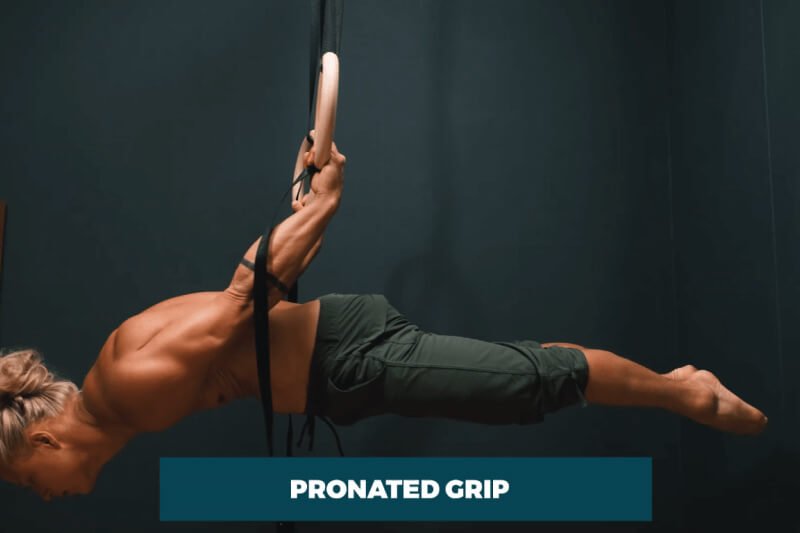
I recommend using this grip, the pronated grip.

Supinated grip, which can be hard on the elbows and biceps.
Back Lever Progressions
The first progression for training the back lever is called the Tuck Back Lever. For the Tuck Back Lever you will tuck both knees closely into your chest. I want to emphasize the words “closely into your chest” here. Really try to tuck your knees as close to your chest as you can - a lot of people think they are tucking their knees a lot when they are actually not. The back lever gets much harder as you extend your hips more and more, so make sure to really tuck, and that will make the tuck back lever easier.
From the Tuck Back Lever, you can try to first extend one hip to 90 degrees. When you are comfortable with that, you can extend both knees to 90 degrees.

You can read a tutorial or watch videos all day, but where will that get you? Take action. Stop thinking about what you want to train, and train it. Get started
From the back lever with legs at 90 degrees, you can move on to extending one hip completely, into a One Leg Half Lay Back Lever. From there you can move on to the Half Lay Back Lever, or, if your legs are opened as though they were in a straddle position, the Open Half Lay Back Lever.
From the Half Lay Back Lever, you will move on to the Straddle Back lever, and from there, you’ll finally move on to the Full Back Lever. And that’s it! Of course, in these last couple paragraphs, there are not many words, but there are a lot of progressions. The work to get from the Tuck Back Lever to the Full Back Lever, of course, will take quite a bit longer than it took for you to read through the progressions themselves.
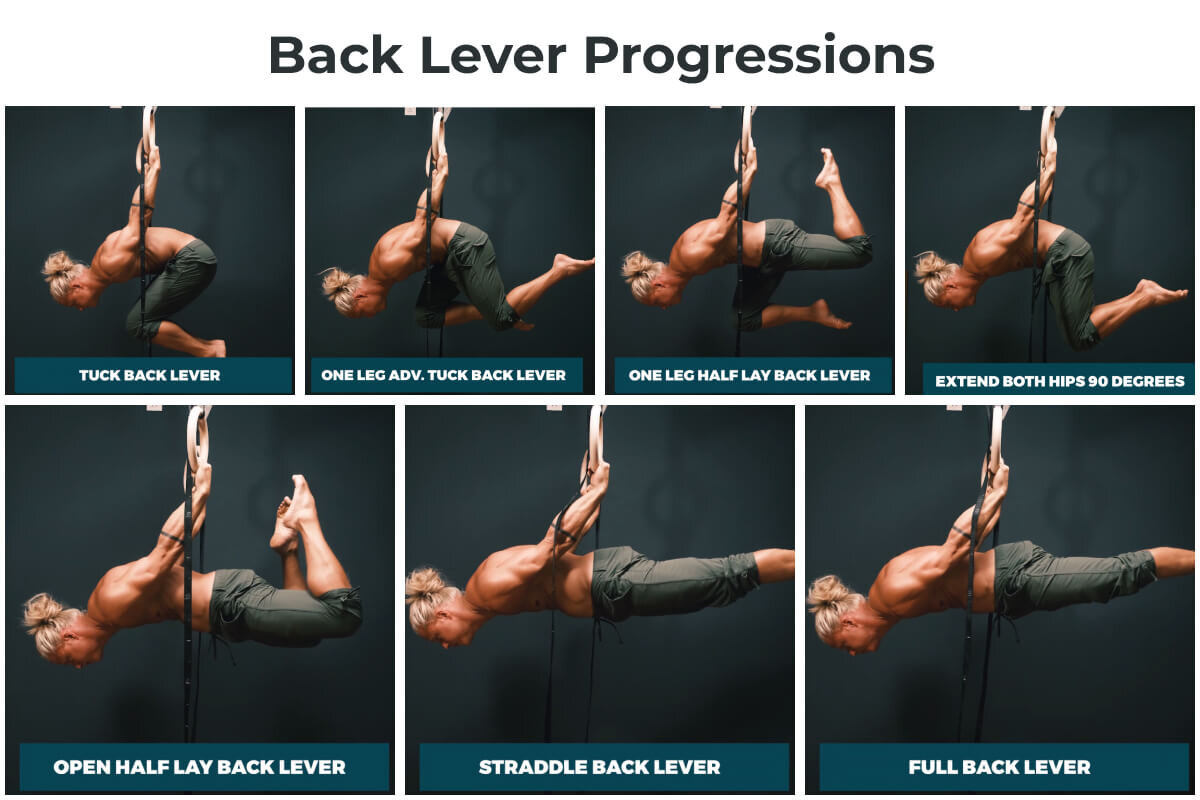
Back Lever Progressions. Aim to hold each progression for 30 seconds before moving onto the next one!
It’s important you become comfortable in each progression before moving onto the next, to build your strength and endurance properly. That way, when you’ve finally arrived at the full back lever, you will really be ready to nail it. The back lever is a movement that puts us at potential risk for injury if we push it too hard, too fast. This is due to our shoulders being very extended while in this position. Our elbows and biceps are also something to be careful with while in the back lever, and this is why it is important to take things step by step.
Another thing to keep in mind is that each of these progressions can be done dynamically. That is, a given position is not done in a static state, but rather you are moving into the position briefly, then returning to the start position. Training this way is helpful in building the strength needed to hold a given position statically. It’s also helpful training this way because you can train with what you may already be familiar with: sets and repetitions, rather than holds and seconds. Here is an example of a dynamic repetition you could use to train the back lever.

An example of a dynamic repetition you could use in your back lever training: Open Half Lay Back Lever repetitions
Core strength
The final piece to the back lever puzzle is your core strength. To do the back lever you’ll be using a little bit of glutes, but mostly you will be using your spine extensors.

This is the correct way to play table tennis, right? Jokes aside, this photo is evidence that you can use just about any flat surface for building your core strength.
One exercise in particular that I recommend is called reverse leg extensions, and you may use different variations of it in your training. In this video, for example, I’m doing the full reverse leg extensions. But if you wanted, you could bend your knees, or open your legs, and make the exercise easier. One way to make the full reverse leg extensions even harder, is to bring whatever surface - a bench, for example - you’re laying on further up your body, from your midsection up towards your chest. This will place more of your body hanging off that surface, and thus require you to lift more weight with your spine extensors.

In any given training session, you could use all of what we’ve spoken about here today to train and achieve the back lever : static hold progressions, dynamic repetitions, and core training exercises. By attacking your training from different angles like this, you will be setting yourself up for success. Remember to take things in a stepwise manner, and make sure you are comfortable with one progression before attacking the next. I recommend being able to hold a given progression for 30 seconds before moving on to the next one, as well as being able to complete 10 repetitions dynamically.
Let’s summarize quickly :). How to back lever:
Learn the German hang.
Decide what grip to use. Pronated grip is recommended.
Build your core strength
Work stepwise through the appropriate progressions
If you’ve gone through this whole tutorial but want further guidance - exact details on where to start, what exercises to do and how to do them, then you should check out my app. In the app, you will find specific exercises designed to train the back lever. As well, you will probably find a whole lot of other movements that catch your eye and may be something you can start to plan to try to achieve in the future, like handstands, the planche, the front lever, and maybe even one arm handstands! It’s all possible. Everything you need to achieve all of these movements is in there.
I truly hope you found this tutorial helpful. As always feel free to leave a comment here or on the YT video - I almost always get back!